Showing posts with label accessories. Show all posts

Sunday, February 10, 2013

Tulle Puff Tutorial

These are super cute in the hair on an alligator clip or a hair elastic. I started making these with tulle scraps leftover from making tutus. Scrappy projects are my favorite! I love creating adorable things with stuff I already have. It's like getting something cute and useful for nothing but a little bit of your time. I've also run across a brilliant idea that uses a larger version of this project hung on a string for home decor use. They would be great, cost efficient party decor or perfect for a little girl's room.

You will need: A few feet of tulle (the kind that comes on a spool is ideal to minimize cutting), floral wire, scissors

1. Cut up tulle into 1 in. x 6 in. strips. If you're using the spooled tulle, you won't have to worry about the length of the strips, as it's already 6 in.

2. Cut about 40 pieces. If you're using more than one color, make sure you have close to the same number of strips for each color.

3. Hold your floral wire about 3 in. down.

4. Begin threading your tulle onto the wire. Stick the wire through the center of the tulle strip and move it down to where you're holding the wire. Thread all the pieces on to the wire, attempting to leave a small space with no tulle in the puff. You'll have a short piece of wire above the tulle and a long piece below now.

5. Wrap the long part of the wire through the space you left in the last step, pulling it tight to secure the puff. Wrap it a couple more times.

6. Twist the short wire with the long one to finish securing the puff, cut the excess wire. Fluff the puff by holding the whole thing in your hand and rolling it around.

There you have it!

Rolled Rosette Variation Tutorial

These are a very cute embellishment, very easy to make, and they are a great way to use up some of that scrap fabric you may accumulate over time. I'll be making a May Day wreath with these later on!

You will need: three 1 in. x 20 in. strips of fabric (these don't need to be perfect by any means), a felt circle about 2 in. across, hot glue gun

1. Stack your fabric strips on top if each other, print facing up.

2. Tie a knot at one end.

3. Use something heavy to hold the knot to a flat surface.

4. Braid the three strips together, keeping the same tension the whole way to keep the braid close to the same width the entire length. (I say this because I'm terrible at it. Thankfully these are very forgiving)

5. When you have about 2 in. of fabric left, tie a knot to finish your braid, pulling it tight. Trim any excess.

6. Glue one of the knots down in the middle of the felt circle. Wrap the braid around the knot. Keep wrapping the braid tightly around itself, using a drop of glue about every half inch between the braid and the felt circle. Keep wrapping until you come to the end knot, which you can glue to the side of the braid.

7. If your felt circle is sticking out, trim off the excess. My circle was wonky, so I had to trim.

You've seen these rosettes in my fab headband tutorial. I love that I can use scraps to make them and they are completely no-sew!

Felt Heart Accents Tutorial

This is an easy 'from the couch' craft. You can add them as accents on paper Valentine's, in a scrapbook, glue them onto a ribbon-lined alligator clip, or use them as a bow center.

You will need: felt in the color of your choice, needle and hand embroidery thread

1. Cut two hearts from the felt, between 1 and 4 inches across. You could use a stencil or cut a half heart into felt folded in half, elementary school style. I used the old-school method. They need to be fairly close in size and shape, but no need to freak if they're not perfect.

2. Tie a knot at one end of a 2 ft length of embroidery thread.

3. Stack the two hearts, lining them up the best you can.

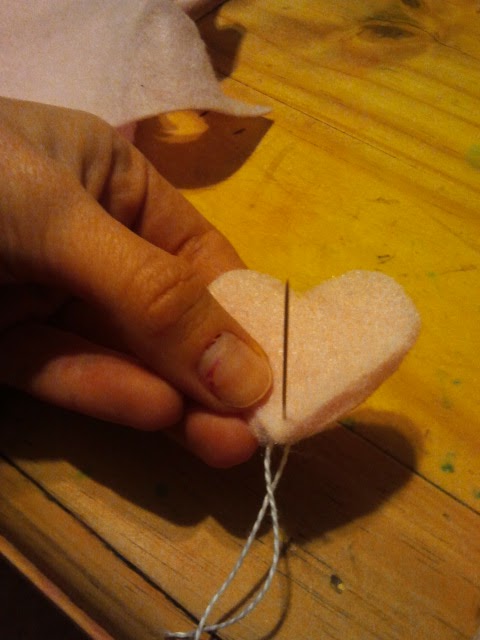
4. Hand sew about 1/8 in. in to the heart, going around the outside using medium sized stitches. If you stitch too small, the felt will tear rather than the stitching holding the two hearts together. Same goes for if you get too close to the edge.

5. When you've gone all the way around the edge of your heart, make sure the remaining thread is pulled through on the same side of the hearts as your initial knot. Knot the thread so your stitches don't come undone. Cut the excess thread.

Now, use your handmade embellishment however you see fit!

Double Ruffle Ribbon Puffs

I LOVE dressing my girls up for the holidays. These cute little hair accessories are perfect for every holiday. Just change the ribbon colors and you've got a 4th of July or Christmas hair clip!

You will need: 12 in. of 5/8 in. double ruffle ribbon in three colors (36 in. total), needle and thread, scissors, lighter for sealing ribbon ends

1. Cut each color of ribbon into four 3 in. pieces. Seal the ends. You can cut the ends into two points by folding the end in half long ways and cutting a triangle from the folded side about half in. down to the outside edges at the top, then sealing by running the flame along the angle quickly. I call that 'forking' the ends.

2. Take one of your ribbon length's and pinch it half in the middle. Run the needle and thread through the middle (after you make certain you have a nice secure knot at the end of the thread, which should be about 12 in. long, by the way). There is no need to find the exact middle, just eyeball it.

3. Repeat step two with the remaining 11 pieces, alternating colors.

4. Now you're going to fan out  the ribbons so that they're going all different directions. For the most part, this will happen naturally, but it's good to fan them to make sure there are no bald spots in your pom pom.

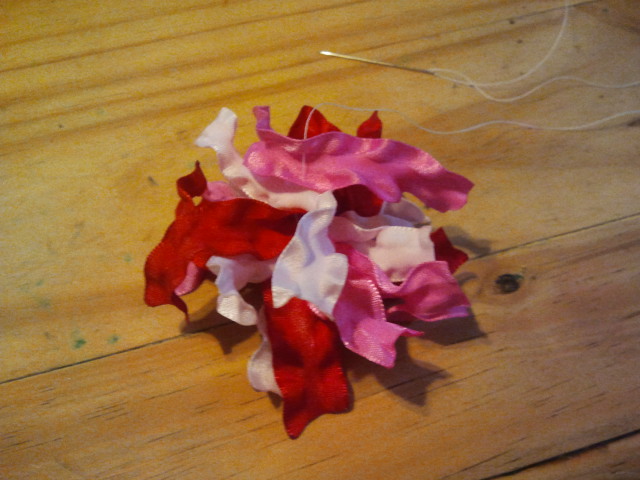
5. Pull the ribbons tight to the knot. Run the needle and thread back and forth through the center of the stack of pell mell ribbons, pulling tight. When the ribbons feel securely together, knot the thread and cut of the excess.

The result should be a super cute pom pom shaped ribbon puff. It's simple and girly and can be used on an alligator clip, hair elastic, or headband. Customize the colors to match any outfit or double them up for adorable pigtails!

The picture with the pink, hot pink, and brown double ruffle puff and the Valentine's Day one showcases the difference between 'forking' the ribbon ends and leaving them straight.

You can also use this technique with 1 1/2 in. double ruffle ribbon. Simply cut your ribbon pieces 5 in. long instead and make the project the same way. You get a puff that is approximately 4 in. wide.

A word of caution: cheap double ruffle that is 'plasticky' down the middle does NOT work well in this project. You'll want to make sure you're using a soft, supple double ruffle ribbon or the ribbon lays flat instead of fluffing. I don't suggest ordering mass quantities of double ruffle ribbon online for this project unless you've ordered it from that company before and know you'll be getting a high quality product.

Friday, February 8, 2013

Stretchy Fab Headband Tutorial

You will need: cotton fabric (about a minimum of 12inx3in, you'll want the length of the fabric to go about 3/4 of the way around the head where the headband will sit, and the width will be the desired width of finished product x 2 plus seam allowance), 7/8 in. elastic (you could even use printed elastic if you have some on hand, though I'm using white because you don't really see it), basic sewing implements, embellishments (whatever you can think up is great)

1. Fold your fabric in
half, hot dog style, right sides together if you're using a print, pin if you like (I didn't bother) and sew using a straight stitch down the raw  edges, using whatever seam allowance you like (though you'll want to remember to allow for it in your measurements if you get too crazy). You'll have an inside out fabric tube now.

2. Flip the tube right side out. I know there are fancy tools for this, but I just stuck my finger in there and pulled it right side out.

3. Insert elastic into the tube openings about 1/2 in. You can pin it if you like, but I just made sure it was in place and dropped the presser foot on it.

4. Sew across the elastic and tube about 1/4 in. in using a straight stitch. Zig zag over it a few times for good measure.

5. Repeat with other end.

6. Now try it on! The beauty of these headbands is the ability to size them easily so they fit perfectly. Don't you hate stretchy headbands that either slide off backwards or squeeze so tight the hair won't lay down?

7. Embellish! Add whatever floats your boat. I've done them with assorted home made fabric flowers, purchased flowers, and one covered in buttons, even. I just hot glued the extras. You could leave it plain so your little lady could wear it for sports. You can match her athletic uniforms perfectly! I have made a few for myself as well.

I have used scraps from pillowcase dresses to make up a headband that matches the dress.

I made the tan one to match a wrap skirt that I'll be getting around to in the near future, and the pink one with the shabby rolled rosettes to match a dress made for my oldest daughter.

P.S., I was having technical difficulties with the pictures. I'll try to get one of each step up when I straighten this out!

Wednesday, February 6, 2013

I'm Taylor, lovely to meet you!

Taylor here, beginning my adventures as a blogger. I've always loved to write, and I've always loved to craft. It finally hit me that I could combine the two, giving me a chance to do a little more of both.

I'm a sort-of stay at home mom, happily married with two girls (7 and 3) and a boy (4). As the blog title implies, I'm no super mom. I forget it's my kids' turn to bring snack more often than I remember, homework disappears into the abyss that is our home if it strays too far from the back pack where it lives, and I'm late a minimum of 20% of the time. These tendencies have made me into a master of improv.

I don't think I've mentioned yet that we live in a tiny, tiny house. I don't have a fancy craft room or even a kitchen table to work at. I have relegated a corner of the tiny closet in our bedroom for my craft supplies and, until I come up with a more acceptable solution, they live in two cardboard boxes. These boxes are the very same boxes in which they were moved to this house. Because of this, I'll ask you to please excuse my scarred, dyed coffee table and the lack of pictures of my fabulous, extremely neat craft room. This is one reason I believe ANYONE can create crafty fabulousness. If I can manage a giant stash of ribbon and fabric in this house, everyone can find a place.

I've learned you can make something out of just about anything. My craft skills are minimal, meaning any project I post, you can absolutely do, too.

I'll be working on projects of about every sort you can imagine including kids' clothes, hair accessories, women's clothes, jewelry, and home decor.

I hope to see you around for my next post: a tutorial on adorable stretchy fabric headbands. (These were born out of necessity the night before my 7 year old's class pictures.)