Showing posts with label ribbon. Show all posts

Friday, February 15, 2013

Super stacked bow tutorial-part 1

You know those gigantic boutique hair bows? The ones you could easily spend a small fortune on? I'm going to show you how to make them! With just a little practice, you can fold bows like a pro. They make great gifts, and it's very handy to be able to whip up a bow to match an outfit before pictures or another big event since custom bows can take a lot of time.

This bow has 5 layers, and I'll show you how to make each of them separately then how to put it together. You can rearrange, resize, and add or remove layers to make this bow your own. I'd love to see your creations!

The layers (from bottom to top): large boutique bow made with 1 1/2 in. ribbon, spikes, larger loop bow, slightly smaller loop bow, medium boutique bow made with 5/8 in. ribbon

To create the large boutique bow:

You will need 1 1/2 in. grosgrain ribbon, needle and thread (I used all purpose polyester thread, two strands), scissors, and a pin.

Cut your 1 1/2 in. ribbon 30 in. long. Heat seal the ends. Lay the ribbon out along side some measuring implement (tape, ruler, whatever you have handy) with the front side down.

Measure out 5 in. and fold that 5 in. over the remaining ribbon. Fold the other end over at the 6 in. mark. Continue wrapping the ribbon around until there are two loops and a tail at either end. It should come out perfect (Okay. You caught me. It probably won't be perfect, but it really doesn't matter much)!

Stick a pin right in the middle to hold the ribbon in place. I like to work on a surface that I can stick the pin directly into. A cutting mat would work great, but anything will do.

Take the outside ribbon loop on the right side and pull it up. Take the inside ribbon loop on the left side and pull it down. Pull the outside left ribbon loop up and the right inside ribbon loop down. Try to get the tails to line up. It should kind of look like a bow already.

Holding the loops in place, begin weaving your needle (pre threaded with a large knot tired at the end) from the bottom (the side closest to you) through the center of the bow, using your pin that should still be there as a guide. Continue weaving until you get to the top of the bow, removing the pin when you reach it.
Pinch the folds made by the weaving together, then pull the needle through until the knot is pulled tight against the bottom of the bow. Wrap the thread around the bow center three or four times then tie it off. You might want to trim the long tail that remains down to about 3/4 in. and re-seal the end.

Voila! You have made a boutique bow!

You'll need to make another with 21 inches of 5/8 in. ribbon to make the top layer of the super stacked bow. You'll fold at 3 inches first, then 4 (rather than 5 and 6), then complete the rest of the instructions. You can make a great bow just by stacking these two bows, but we're going to add more layers.

I'll try to get the rest of this project up tomorrow!

Sunday, February 10, 2013

Wide D-Ring Ribbon Belt

This project can be adjusted for little girls by using 1 1/2 in. ribbon instead of 2 in. ribbon.

You will need: 2 in. grosgrain ribbon (to get the measurement for your ribbon, measure your natural waist then add seven inches), two 7/8 in. d-rings (these can be found with the sewing notions), basic sewing implements

1. Heat seal the ends of your ribbon.

2.Put one end of your ribbon through both d-rings. You may have to accordion fold the ribbon to get it though neatly. Pull it through about 2 in. and fold it back against the length of the ribbon.

3. Sew across the two layers of ribbon about 1/2 in. down from the d-rings.

4. Reverse stitch back over the initial line of stitching. You'll see in the pictures that I used white thread with navy ribbon. You may want to use coordinating thread so that the stitching isn't so obvious.

5. Repeat steps 3 and 4, only about 1/4 in. further down. This second row of stitches will provide a more secure hold.

6. To wear the belt, wrap around the waist and pull the free end of the ribbon through both d-rings, then fold it back over and pull it back through the second d-ring until the belt is tight. It's made to be worn at the natural waist.

I love the gathering that you get using d-rings much smaller than the ribbon. If you prefer a straighter look, use larger d-rings.

Double Ruffle Ribbon Puffs

I LOVE dressing my girls up for the holidays. These cute little hair accessories are perfect for every holiday. Just change the ribbon colors and you've got a 4th of July or Christmas hair clip!

You will need: 12 in. of 5/8 in. double ruffle ribbon in three colors (36 in. total), needle and thread, scissors, lighter for sealing ribbon ends

1. Cut each color of ribbon into four 3 in. pieces. Seal the ends. You can cut the ends into two points by folding the end in half long ways and cutting a triangle from the folded side about half in. down to the outside edges at the top, then sealing by running the flame along the angle quickly. I call that 'forking' the ends.

2. Take one of your ribbon length's and pinch it half in the middle. Run the needle and thread through the middle (after you make certain you have a nice secure knot at the end of the thread, which should be about 12 in. long, by the way). There is no need to find the exact middle, just eyeball it.

3. Repeat step two with the remaining 11 pieces, alternating colors.

4. Now you're going to fan out  the ribbons so that they're going all different directions. For the most part, this will happen naturally, but it's good to fan them to make sure there are no bald spots in your pom pom.

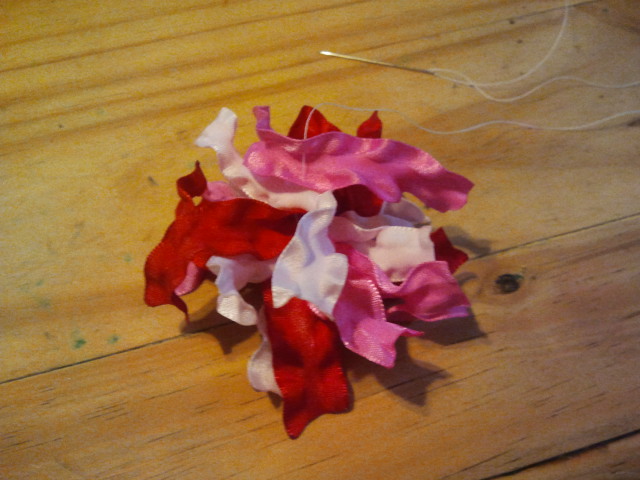
5. Pull the ribbons tight to the knot. Run the needle and thread back and forth through the center of the stack of pell mell ribbons, pulling tight. When the ribbons feel securely together, knot the thread and cut of the excess.

The result should be a super cute pom pom shaped ribbon puff. It's simple and girly and can be used on an alligator clip, hair elastic, or headband. Customize the colors to match any outfit or double them up for adorable pigtails!

The picture with the pink, hot pink, and brown double ruffle puff and the Valentine's Day one showcases the difference between 'forking' the ribbon ends and leaving them straight.

You can also use this technique with 1 1/2 in. double ruffle ribbon. Simply cut your ribbon pieces 5 in. long instead and make the project the same way. You get a puff that is approximately 4 in. wide.

A word of caution: cheap double ruffle that is 'plasticky' down the middle does NOT work well in this project. You'll want to make sure you're using a soft, supple double ruffle ribbon or the ribbon lays flat instead of fluffing. I don't suggest ordering mass quantities of double ruffle ribbon online for this project unless you've ordered it from that company before and know you'll be getting a high quality product.

Heart Ribbon Sculpture Tutorial

This project is VERY easy and very versatile! You can add layers to your heart, or simplify and use only one layer. Experiment to get the look you want.

You will need: 15 in. of 3/8 in. grosgrain ribbon, hot glue gun and glue sticks, something to seal ribbon ends (I use a lighter), scissors

1. Cut two pieces of ribbon 4 1/2 in. long and seal the ends. If you're using a lighter, simply run the ends through the flame quickly to avoid fraying. Cut two 3 in. pieces and seal those ends as well.

2. Take one of your 3 in. pieces and place the ends together. Place a line of glue on one of the ends and pinch together. Repeat with the other short piece.  You should have two little tear drop shapes now.

3. Wrap one of the long pieces over one of the tear drops, lining up the ends of both pieces. Glue the long pieces ends on either side of the tear drop's point. Repeat with the other long piece and tear drop. You'll now have two double layered tear drops.

4.  Place the pointy ends of each tear drop together and line them up straight. Line glue about 2/3 of  up the outside layer of one tear drop, between the two tear drops. Pinch together.

And now you have a heart shape! You can now glue it to a ribbon lined alligator clip to go in the hair, or onto a fab headband, on a pin for your jacket, or even blow up the measurements and use 7/8 in ribbon and place on a piece of card stock that can go in a shadow box frame for home decor at Valentine's Day or in a little girl's room year round!